Late Pizza Delivery
Made For the Chasm’s Call Challenge
A man is on his pizza delivery route but he’s a little too late.
Edited in Davinci Resolve
Rendered in Blender EEVEE
Credits:
Andrew Deaver- All Aspects
Music credits are:
Future Girlfriend 音楽 - Benson cut 今夜
DRIVERS
A DEEP DIVE
While you go through this document, you will see values that are shaded in purple. This means this value is driven by a value outside of the object. I linked all of these drivers to a single object to easily drive “events” in the scene rather than deal with keyframing everything individually.
When concepting this idea, I knew I would be using drivers (aka, a single keyframed value) to drive my entire procedural animation. I find manual keyframing disorganized and tedius when dealing with multiple objects and I often like changing my mind on retiming things after seeing the final animation. I was initially worried about drivers in blender being complicated as the documentation feels sparse and blender gurus tended to not explain them very well. I discovered they are not only super easy but extremely powerful and extremely efficient and I believe ALL aspiring procedural artists need to learn how to use drivers in their scenes to cohesively bridge the gap between objects, materials, modifiers, and geometry nodes interacting with each other.

Most tutorials online will use PHYSICAL IN SCENE OBJECTS to demonstrate drivers, however, this is not necessary as you can have values that lead to NOTHING drive multiple objects. This way, you don’t need an object to drive values but one value to drive them ALL.
For this scene, I used a completely empty object with a completely empty geometry node setup with two values that initially control nothing. However, copying these values and pasting them as new drivers allows these values to control anything outside the object

Right click and copy the value as a new driver
Right click almost ANY channel and paste driver and you’re pretty much done unless you want to dive deeper into the control
Either, open up the driver editor or right click the value and select edit driver.
This is where most people get overwhelmed but its less complex than it looks as you won’t be messing with half this stuff.


1: Input variables
This is where the values driving the target value will be stored. Multiple Variables can be used and interact with one another
1.1: Copy/Paste variables
You can paste values that you used “copy as new driver” on or copy ALL variables contained in this driven value to then paste elsewhere.
2: Variable Name (case sensitive)
This is the name of this paticular variable and will be used if using expressions
3: Variable location
Both Prop and Path describe the location of this variable. It is much easier to copy values as new drivers rather than use this area manually.
4: Fallback value
Checking this box enables a fallback value if (for whatever reason) your input variable cannot be found. Useful for debugging
5: Variable Value
Displays a realtime Value of your variable (if not, click update dependencies. Values may not update if the scene is heavy. This value WILL STILL CHANGE during rendering)
6: Type
This tells the driver how the variables should be used. Scripted Expression is the best option as it provides the most control. If using Scripted expression move to 6.1
6.1: Expression
This window WILL ONLY APPEAR if using scripted expression. Here you can input pseudo code using the variable names (fig. 2). You can do things like multiply an existing value by the variable, add the variable to the value, or use the variable entirely. In this example, the variable is being read as a positive number even when negative and if the value is above 0 the value will return 0.
in layman’s terms: invert the negative value and if it becomes positive, read it as 0.
Blender documentation has a list of expressions and global variables here
7: Outputted Value
This is the value that is outputted after being put through the type/expression. In this case, it is outputting 0 because the expression tells the value to turn to 0 if the variable is positive.


(From Left to Right)
This is the driver we had just looked at. Here is an empty driver controller geometry nodes that has NO NODES inside of it. It is purely used for the values to drive drivers outside of this object.
This is the star that disappears halfway into the animation. It is being driven by the Shrink&Grow driver controller inversely
As the Shrink&Grow approaches 0, the star begins to shrink.
When the Shrink&Grow driver becomes positive, the star has vanished as it has a scale of 0 and the black hole has appeared as I have given it the opposite effect, to grow as the Shrink&Grow value goes up.
Congrats! you know drivers. For you shader junkies, you now have an animated way of controlling your color ramp stops all in sync, and basically any value you can think of can be controlled by a driver even… RENDER SAMPLES???
For me, It was IMPERATIVE to control everything with a driver, as all my lights were FAKE, all the material colors were FAKE, and all my physics were also FAKE. Not only that, but several values could not use one another such as the black hole displacement effects on all the objects being sucked in. Key framing everything would have been burnout heaven and confusing for anyone to look at. With this method however, I eliminated bloat and have an easily controllable, stylized scene.
Now count how many purple values you see in my breakdown.
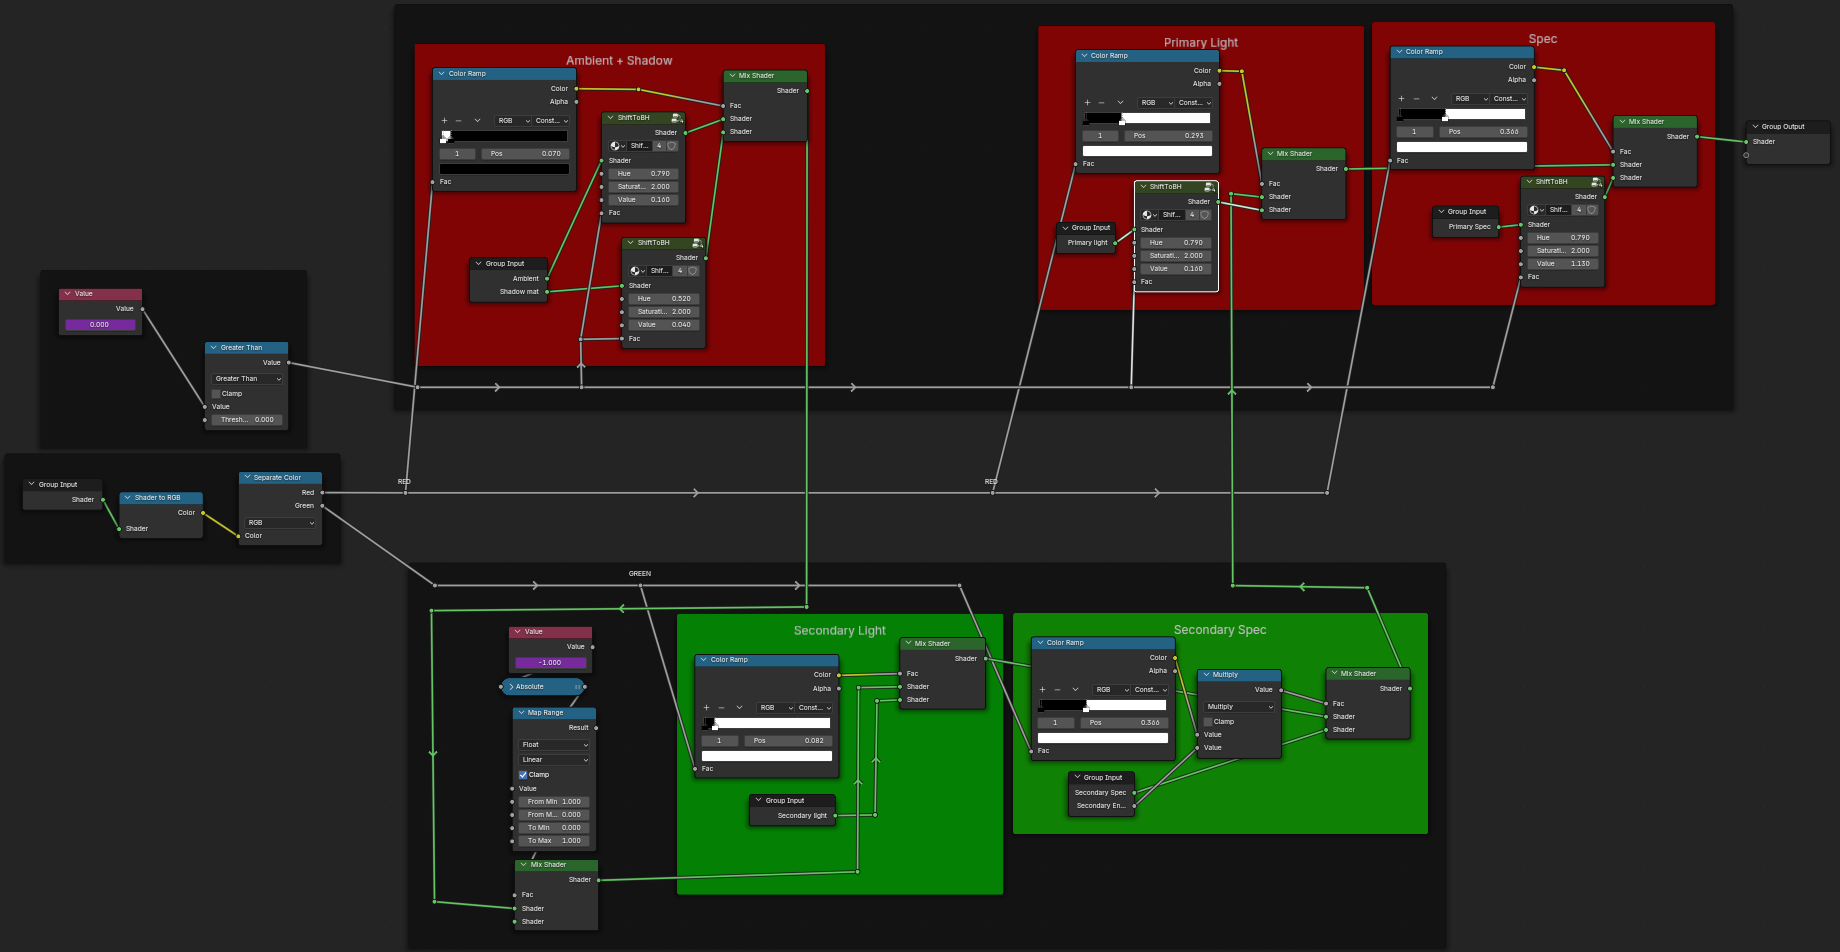
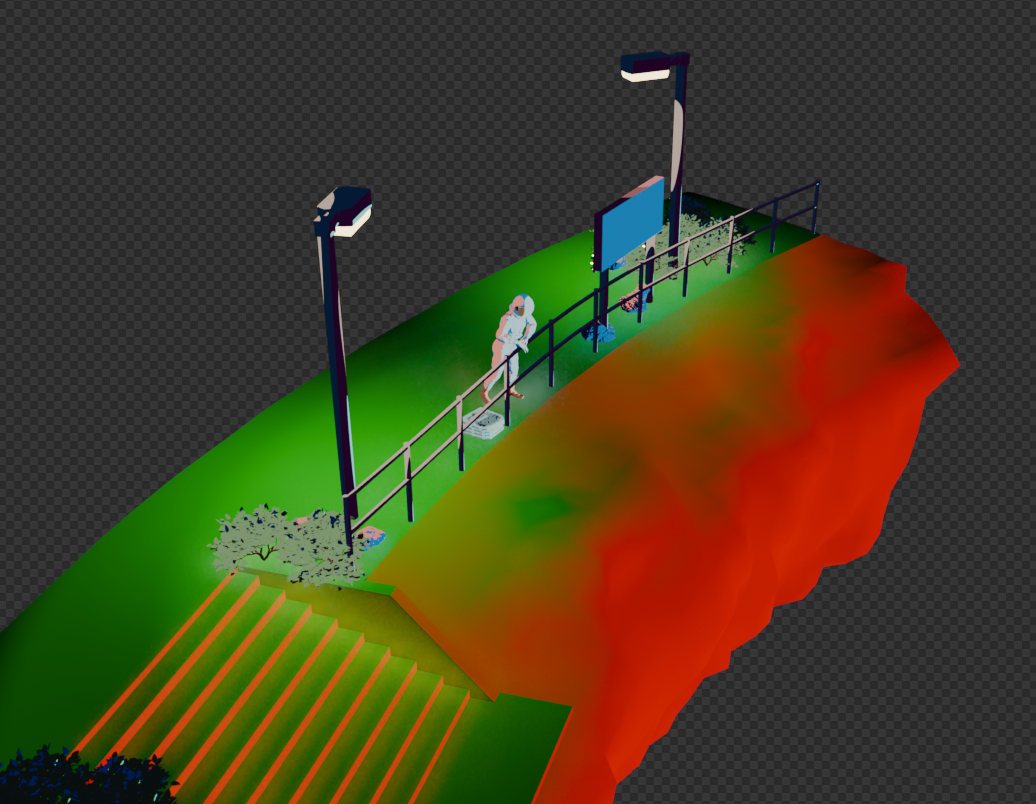

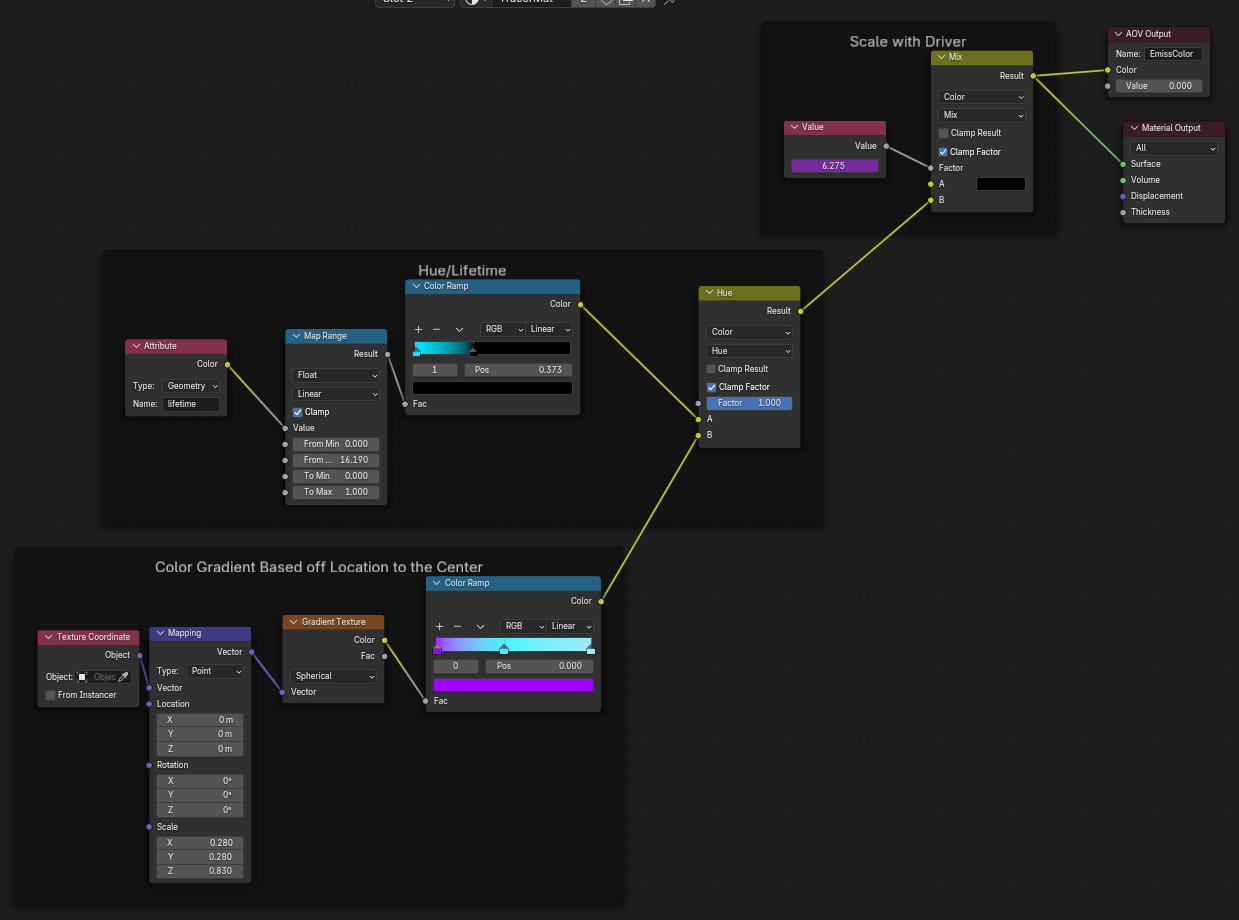
Shaders
Initially, the shader was made using spec and diffuse shaders separating the reflections and the lighting but this method proved to be uncontrollable and overly detailed for a stylized animation.
I searched for a new method and discovered a way of separating lights using RGB channels in the shader. This allows precise control of how primary and secondary lights react to certain materials. On top of this, I used a driver to change the hue to adapt to the sun to black hole transition.

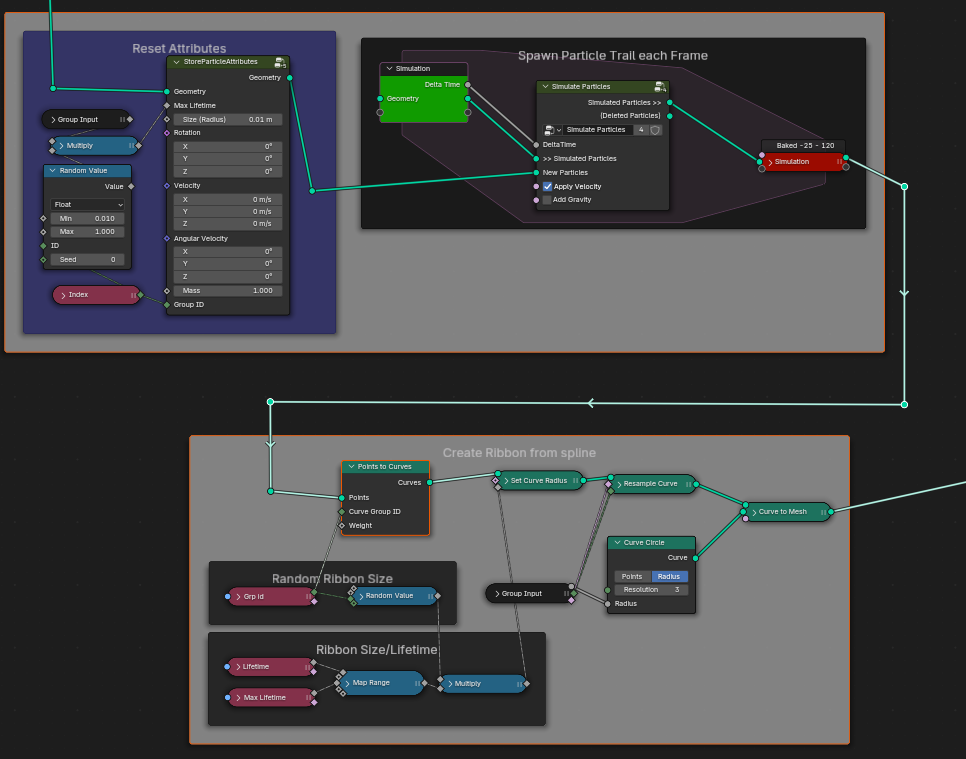
Particle System
Originally, this was being simulated using Blender’s particle system and forces but it was uncontrollable and wouldn’t allow as much customization as I wanted. I ended up researching how to simulate in geometry nodes and not only did it give me much more control, but it was also more performative. This allowed me more freedom with coloring the particles, adding trails, and specifying the “orbit” I wanted rather than performing rocket science on the pull to vortex ratio.
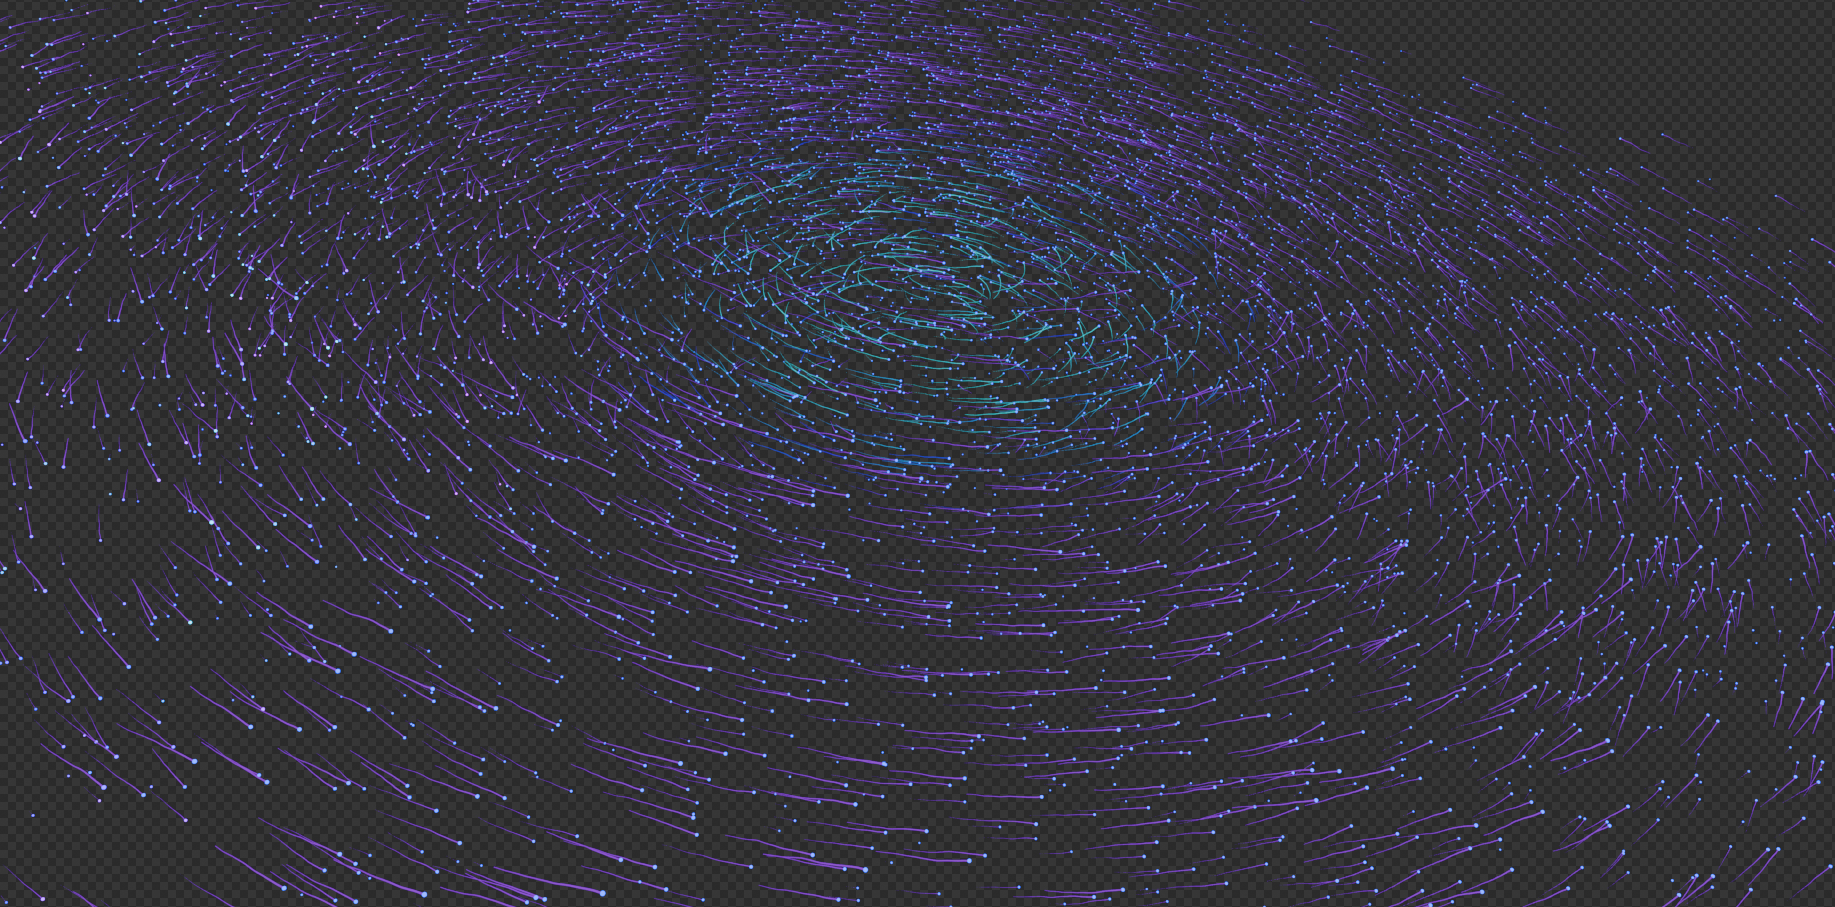


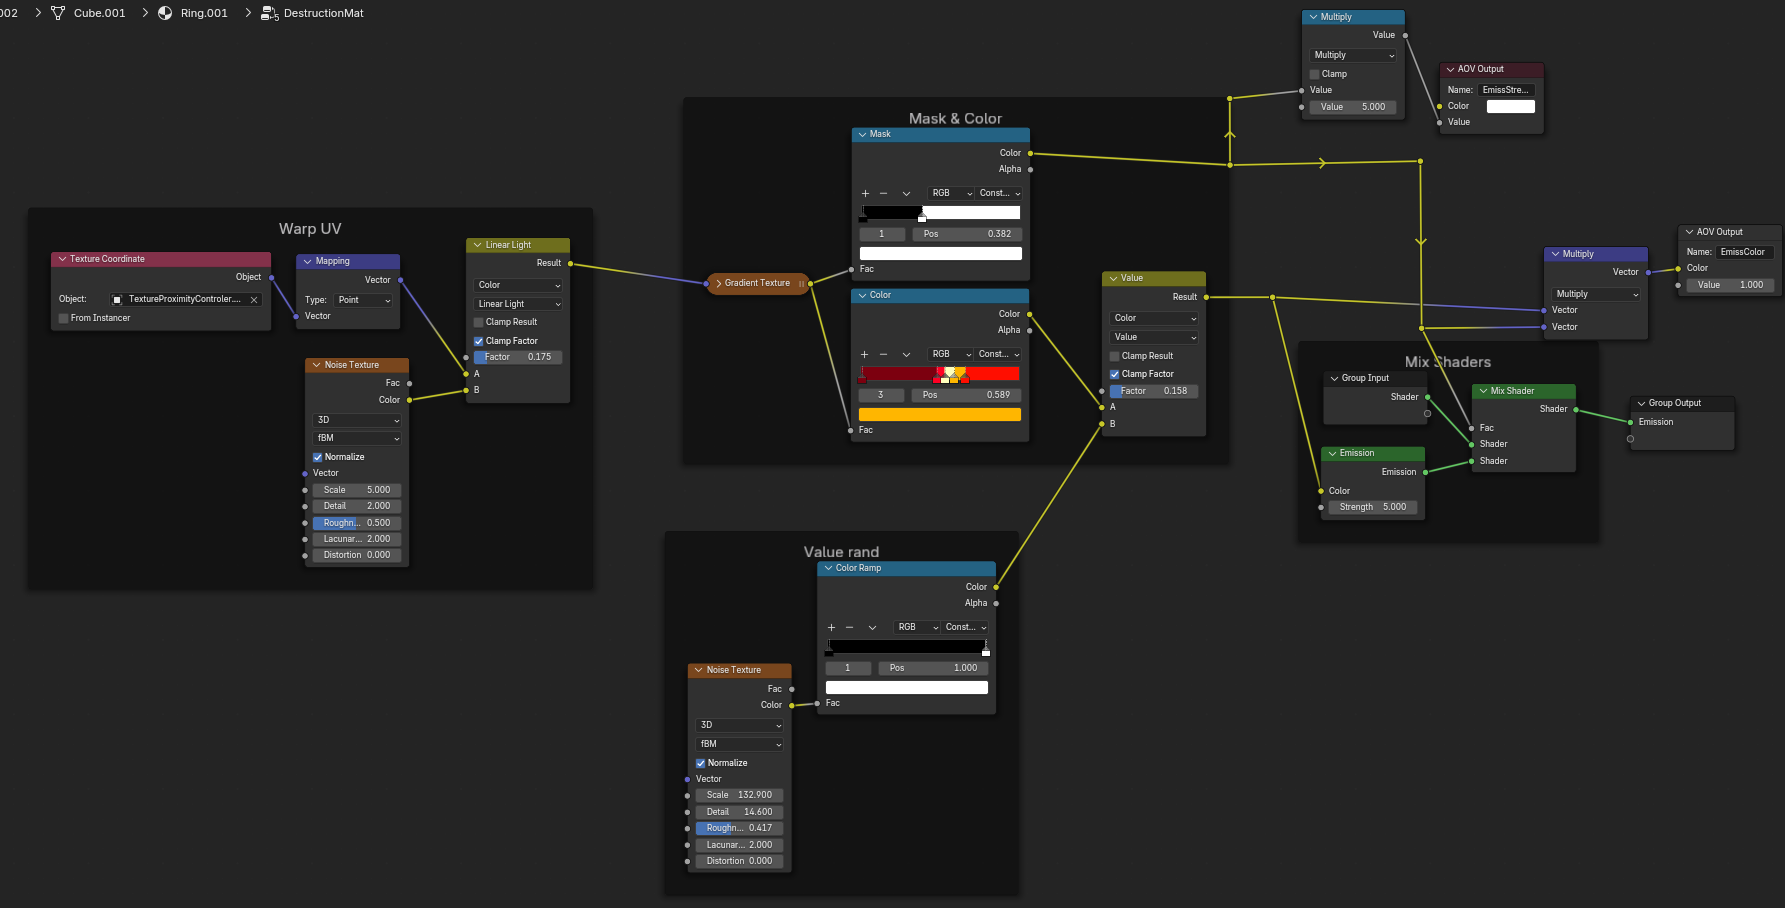
Nebula Volume
First glance would’ve led you to believe this volume was simple. Although the initial spiral UVs was something easy, getting the density to interact with the planets and particles JUST RIGHT was a task to behold. I believed the Nebula was just as if not more important than the particles around it especially after I had trashed having an HDRI in the first place.
This nebula is good from all angles and provides a small pocket in the center to not obscure the space station and has both warping and rotating animations as well as emission strength and color driven by the same driver for the black hole. Surprisingly, this entire shader is incredibly efficient as the volume doesn’t interact with ANY lights and I instead chose to fake its lighting leading to lightning fast render times and total control over its look.
Since the volume is instanced in the node tree of the particles, I also decided to use it as the particle spawner meaning any transforms done to the volume are done to the particle instancing as well.

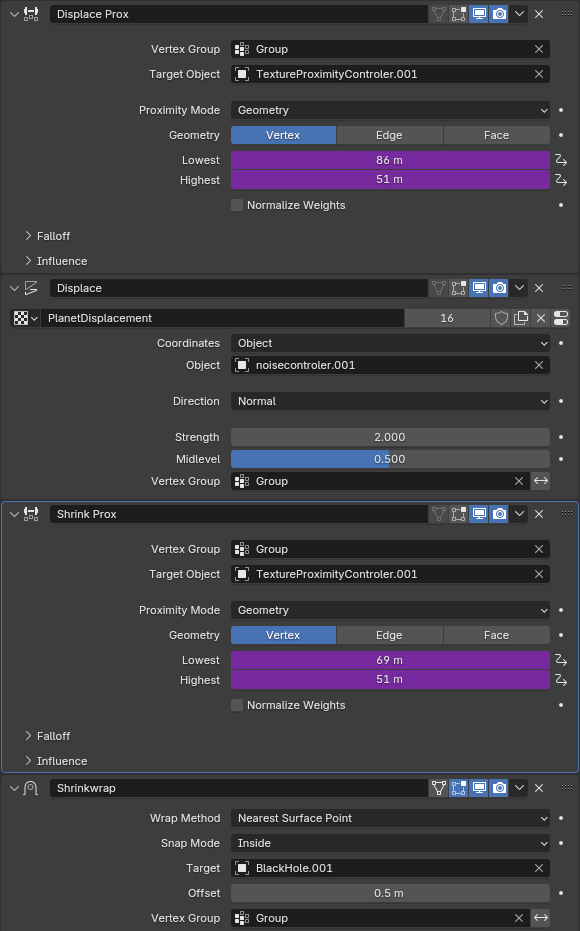
Black Hole Modifier
In the beginning concept, I was going to have the planets explode and the debris to begin swirling around the black hole but the tech to do multiple simulations, with cores that are emissive, and getting the forces right was a HORRIBLY LARGE task AND wouldnt come through in the art style. I discovered a method to make the destruction look good without being too complicated at a distance.
I used an empty in the black hole that would drive a vertex group in each object to hold the distance of the modifiers but unfortunately the empty did not drive the modifiers by its scale. Luckily, because the entire black hole animation was driven by a single driver, I was able to drive each object with the modifier with the driver value that was ALSO driving the black hole expansion.
I could then use the vertex group to also create a mask in the materials to make the displaced geometry look “fiery”.